Monday 25 July 2011

Microsoft Access Tutorial

Any one who want to learn or work on the MS Access so this tutorial is really going to help them all and don't worry about the version cause when you know the basic so you can do work on any version of Ms Access (2000, 2003, 2007 or 2010) just clear the concept and go on no problem so lets start with little introduction of Ms Access 


Little Intro to Ms Access 
MS Access is basically a Relational Database Management System (RDBMS), designed primarily for home or small business usage.


How To Install Ms Access


I am going to tell you how to install Ms Access 2010 
when you will insert the CD/DVD the setup will automatically start if not then just click on the CD/DVD drive and select the SETUP.EXE file and it will start now it will take some time to load some file then it will ask you license term condition so just check it and press continue 


after pressing continue it will look like following if you want to completely install the Ms Office just press Install other wise click on customize option

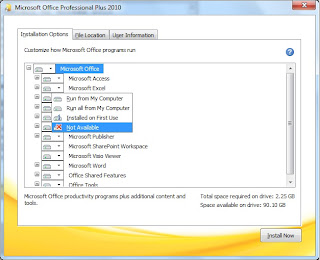
 On clicking Customize you will get a window from here you can un-select your not required option by clicking on the drop down menu

 and select the option Not available "Be careful do not select Ms Access as Not Available"

 After doing selection press Install Now option this will start installing the Ms Office /Ms Access

Opening Ms Access
To Open the Ms Access click on START MENU --> All Programs --> Ms Office --> Ms Access now your Ms Access will start and it will look like 

Now their are many option and menus 
  • Blank Database (Simple Database )
  • Blank Web Database (Database link with website)
  • Recent Templates (Sample/Templates you used)
  • Sample Templates (Some Sample of Database) 
  • My Templates (Your Own created Database)
BLANK DATABASE
After selecting the Blank Database and pressing the create Button you will get the following Screen 


Well basically we use Blank Database cause its totally blank and there is no predefined Field Name or Data Type "Field Name are the use to define what type of information we will enter "Name, CNIC, TEL#, AGE etc" and Data Type tells that what type of the data is going to enter in the field "Text, Number, Data/Time, etc " this very important to define the type of the field 
e.g:- if you want the records of persons name so Field Name should like "NAME" and the Data Type must be "TEXT" Don't place space in defining the Field Name Cause some time it create problem in creating relation ship. use underscore "_" instead of space.


Now Click on the View option as shown in following fig and select the Design View. In Design View you can enter the field name and data type 


On clicking the Design View a Message box will appear it will ask  to save the table type the table name by which you want to save and press OK table name must define the stored records/information
For Example:-
If you are going to store the records of Students Fee so table name like "FEE or FEE RECORDS or STUDENT FEE"


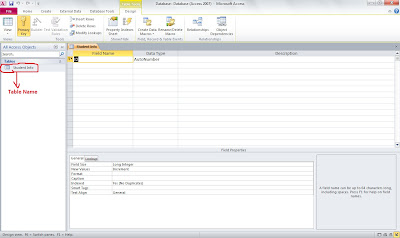
On Pressing ok you will get the following screen


There are few option in this view like
  • FIELD NAME
  • DATA TYPE
  • DESCRIPTION
  • FIELD PROPERTIES 
You are now familiar with the FIELD NAME & DATA TYPE now their are new option DESCRIPTION in this area we describe some information related to the field name and data type
For Example:-

this option is not necessary to fill you can leave it empty

Now just fill the FIELD NAME & DATA TYPE 


Friday 22 July 2011

HTML Tutorial

Well now a days every thing is going online no matter buying, selling, personal portfolio, personal business or multinational companies even online jobs are available

In this tutorial I am going to teach you some basic of HTML (Hyper Text Markup Language)

But first let me tell you what is HTML. It is a language which we use to create the webpage

It contain (tags)  these tags are in pair cause their is open tag and close tag. These tags are enclosed by the angle brackets like "<HTML> it is an opening tag "</HTML>" this is a closing tag. Some tags contain the attributes the attributes are the use to customize the tags function.    

All the HTML file can be create in normal Note Pad or you can download the advance version of note pad from here "notepad++" .
HTML is not a case sensitive language so no worries if you write <HTML> or <html>  lets have an example

You can open a note pad by clicking on start menu --> All Programs or Programs --> Accessories --> NotePad


Basic Syntax of HTML (Web Page)
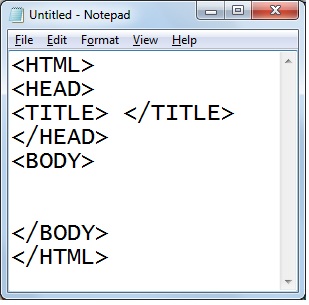
Well this is the basic syntax to create a web page 

As you can see there are 4 tags and each tags are in pair 1 opening and other closing tag


  • The <HTML> tag shows it is a webpage document 
  • The <HEAD> tag tells it is a container.  Elements inside <HEAD> can include scripts, instruct the browser where to find style sheets, provide meta information, and more.
  • The <TITLE> tag
    • defines a title in the browser toolbar
    • provides a title for the page when it is added to favorites
    • displays a title for the page in search-engine results

  • The <BODY> tag contains all the contents of an HTML document, such as text, hyperlinks, images, tables, lists, etc. 
Tags
Some common  tags use in creating webpage 
Tag
Description
<!--...-->
Defines a comment
<!DOCTYPE> 
Defines the document type
<a>
Defines an anchor
<b>
Defines bold text
<basefont />
Defines a default font, color, or size for the text in a page
<big>
Defines big text
<body>
Defines the document's body
<br />
Defines a single line break
<button>
Defines a push button
<caption>
Defines a table caption
<center>
Defines centered text
<col />
Defines attribute values for one or more columns in a table 
<font>
Defines font, color, and size for text
<form>
Defines an HTML form for user input
<frame />
Defines a window (a frame) in a frameset
<frameset>
Defines a set of frames
<h1> to <h6>
Defines HTML headings
<head>
Defines information about the document
<hr />
Defines a horizontal line
<html>
Defines an HTML document
<i>
Defines italic text
<img />
Defines an image
<input />
Defines an input control
<label>
Defines a label for an input element
<li>
Defines a list item
<link />
Defines the relationship between a document and an external resource
<menu>
Defines a menu list
<meta />
Defines metadata about an HTML document
<object>
Defines an embedded object
<ol>
Defines an ordered list
<optgroup>
Defines a group of related options in a select list
<option>
Defines an option in a select list
<p>
Defines a paragraph
<s>
Defines strikethrough text
<script>
Defines a client-side script
<select>
Defines a select list (drop-down list)
<small>
Defines small text
<span>
Defines a section in a document
<strike>
Defines strikethrough text
<strong>
Defines strong text
<style>
Defines style information for a document
<sub>
Defines subscripted text
<sup>
Defines superscripted text
<table>
Defines a table
<td>
Defines a cell in a table
<textarea>
Defines a multi-line text input control
<th>
Defines a header cell in a table
<thead>
Groups the header content in a table
<title>
Defines the title of a document
<tr>
Defines a row in a table
<u>
Defines underlined text
<ul>
Defines an unordered list

Save The HTML File
After doing the above task now we are going to save our work for this go to File menu --> save the following option will appear 

now type the File Name you want to save your page then place .html after the file name this will save the file as a webpage which will open in web browser. The .html is the file extension
Remember must save all the web page in one folder for example if you are making a website for some organization so you must save all the webpage of that organization in one folder every time you create the website for different organization do make the folder of that organization separately and keep all the related picture, document, files etc in that folder with sub folder like folder for images etc  

Browser Support

Internet Explorer Firefox Opera Google Chrome Safari

to open the source code of the webpage you need to move the cursor on the webpage icon and do right click --> open with --> notepad


How do we work in Body and Title tag 
As we already discusses that in body tag we do all work which will be display in the browser 


Code


OutPut


Now i would like to tell you how to customize your font according to the requirement for this we are going to use the <FONT> tag its also a pair tag lets have a look
The font tag contain some attributes which is use for the customize the font style


Attributes of Font 

Attributes
Description
Face
Defines font-family 
Size 
Defines size of font "size(2-6)"
Color
Defines color of font (BLUE,GREEN etc)

Code


OutPut
Underline Bold Italic
some time we want to make some important words or sentence visible Separately so we some time underline it Bold it or Italic it for this we use the following tags 

  • <u> Underline </u>
  • <b> Bold </b>
  • <i> Italic </i>
  • lets have a look


Code


 Output 
See the above example its bit messy to make it more clear an understandable we are going to use the <br> tag it is a single tag there is no closing tag for this. The <br> tag is use to Break the Line 
Lets Have a Look

Code


Output

Listing 

Some time we need to make a list of some thing it could be the list of the name, places, items etc there are the 2 common types of list in HTML 
Order List <ol>
Unordered List <ul> 

Ordered List Types

Lower-Case Letters
Upper-Case Letters
Lower-Case Numerals
Upper-Case Numerals
a.     Find a Job
b.     Get Money
c.      Move Out
A.   Find a Job
B.   Get Money
C.   Move Out
       i.           Find a Job
     ii.           Get Money
  iii.            Move Out
       I.            Find a Job
    II.            Get Money
 III.            Move Out


Unordered List Types

Square
Disc
Circle
§  Find a Job
§  Get Money
§  Move Out
·        Find a Job
·        Get Money
·        Move Out
o   Find a Job
o   Get Money
o   Move Out


Lets have a look


Code


Output


Table
Tables are seem difficult to create, but after working you will not feel like that again. The <table> tag is also a pair tag <table> used to begin a table. Within a table tag we have <tr> (table rows) and <td> (table columns) tags. The attribute of the table are

  • Table border
  • Table header
  • Colspan
  • Rowspan
  • Cell padding and spacing


Lets Have a Look


Code


Output


Adding Images Pictures to your Site
In every website we see pictures images etc so how they do that.Don't worry its too easy you can also do that just one tag <img src >  tag its not a pair tag there are some attributes of image


Image Attributes  

  • Height
  • Width
  • Border
  • alt (Alternate value "Right, Left, Center")
  • align (Position of image in horizontal "Top, Bottom, Center")
Lets Do some Example

Code

As you can see i did not write the complete path of the image just the folder name and the image name with extension this is because I save the image in a folder of Image folder which i created with in the folder where my webpage is save this make no need of full path of the image but if we place image in different place and the webpage in different so we need the complete path of the image other wise the image will not display

Output

You can also apply picture or image as a backgroung of the webpage but be careful in choosing the background. Choose background which i light in color so it will not effect on the text of webpage on my concern always choose the light color and not very textured background to avoid facing problem in reading the text for reader
To Apply the image on background use attribute of <BODY background = " path of image"> or you can use <Body bgcolor ="Any Color Name"> this will give a solid color 
Example

Code


Output

Work With Hyper-links
The hyper link is use to link the other page of website or any other URL or website link this is use to call any other page or links from your website 

Example if you want to give a link of yahoo on your web site so you are going to use the <a href> the hyperlink tag there is a attribute "target = blank" which allow you to open the linked page in new blank browser lets have an example 

Code
 The last link will open in new tab but the remaining three will open on the same page you are working on
Output

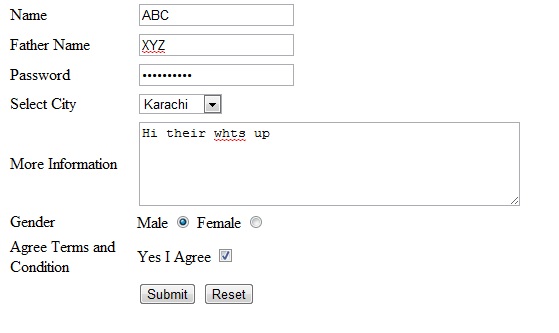
Creating The Form
Many time you saw or fill the form page to get ID, to get Registered for some thing etc today you are going to create your own form page. 
The <form> tag is used to create an HTML form for user input. A form can contain input elements like text fields, checkboxes, radio-buttons, submit buttons and more. A form can also contain select menus, textarea etc

Example

Code

Output

This look bit messy and difficult to understand the good idea to make beautiful and clear form is creating in table 
here is an example

Code

 Output