PHP Tutorial Step By Step
Hello Fellows after learning about HTML
now we are going to learn about PHP first of all we should know what is PHP?
and how it works.
PHP (PHP Hypertext Preprocessor).
PHP is a widely-used general-purpose scripting
language that is especially suited for Web development and can be embedded into HTML.
PHP
is Server-side embedded
scripting language. It provides web developers with a full suite of tools for
building dynamic websites.
As i told you that PHP is a server side
Language so you cannot run directly on your computer or laptop, but HTML is client side that can easily run on client Computer/Laptop, to run the PHP on your computer you need
to install a local host server like
what is wamp server ??
WampServer is a Windows web development environment. It allows you to create web applications with Apache2, PHP and a MySQL database. Alongside, PhpMyAdmin allows you to manage easily your databases.
Steps for Installing WampServer

Step 1
Download the WampServer (<--- click to download ) from the given link and then open the location where you save that wamp exe file double
click on it
Step 2

This
will appear on your screen when you double click on the wampserver.exe file
click NEXT and
Step 3
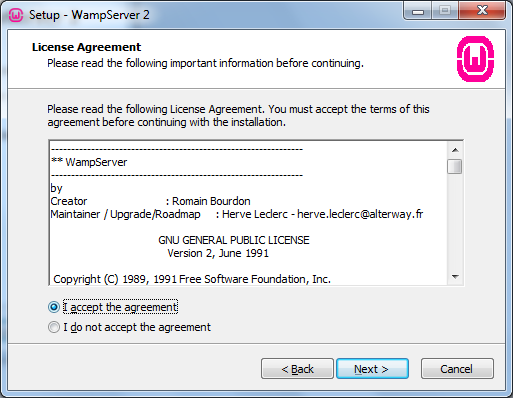
This
screen will ask you about the License agreement just Click I Accept the
agreement and click Next
Step 4

This step is asking where you want to
save/install your Wamp server mostly we do not change the path but if u want to
change the path or different folder click the BROWSE button and select the new distention
or folder where you want to install the wamp and click NEXT
Step 5
This step is asking you that if you want to
create the ICON of Wapm server on Desktop and Quick Launch if they are uncheck
then check them and click NEXT
Step 6

This
step shows some information about the wapm that where you are installing and
about the icons so just click INSTALL
Step 7

Now
the installation is start and it will take little time depends on your computer
speed when Extracting files is complete
Step 8

Now it will ask you to select your browser where
that wampserver will run so just click open
Step 9

In this step it is asking permission for the
access from the fire wall just check Private if you are using it at your home network
other
Step 10

In this its asking about the mail parameter we
will not change it cause we are using local host but if you want to change it
you can change it but this will make some problem in feature so try not to
change it and press NEXT
Step 11

This
step will ask that if you want to run/launch the Wamp now or later so just do
as you like if you want to launch it now just check the Launch WampServer now
and press FINISH
Step 12
If
you launch the wamp server Now then it will ask you a permission press yes and
then it will run the wamp when it will start wamp small icon will appear on
your System Tray like this

That GREEN color Icon shows that wamp server is on if it’s RED that means not yet ready or if it is in ORANGE color
that means starting up
When
you will start the wamp it always like
1st
RED 2nd ORANGE 3rd GREEN